So, you've got something to say and you're itching to start a podcast from the comfort of your own home? Fantastic! Podcasting is an amazing way to connect with an audience, share your passions, and build a community. In this complete guide, we'll walk you through every step of the process, from setting up your home studio to getting your voice heard around the world.
Here’s a sneak peek of what we’ll cover:
- Essential Equipment: We'll break down the must-have gear, from microphones and headphones to recording software, and show you how to get started without breaking the bank.
- Setting Up Your Home Recording Studio: Discover how to transform a spare room (or even a closet!) into a sound-optimized space that minimizes echo and background noise.
- Recording and Editing: Learn the techniques for capturing clear audio, editing out mistakes, and polishing your episodes for a professional sound.
- Publishing and Promoting: We'll guide you through choosing a hosting platform, submitting your podcast to major directories, and promoting your show to attract listeners.
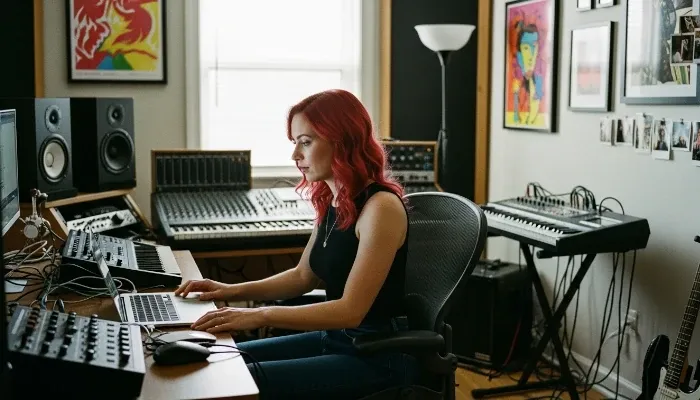
Essential Equipment to Record a Podcast From Home
Alright, let's talk gear for your podcasting journey! If you want to 'record podcast from home' and actually sound good, you need more than just your phone's voice recorder. The absolute core essentials are a good microphone, headphones, and a computer with recording software. Think of the mic as your voice's direct line to your listeners – a cheap one makes you sound distant or muffled. USB mics are super simple; just plug 'n' play. Popular ones like the Samson Q2U or Audio-Technica AT2020+ USB are great entry points.
If you want that extra level of quality or flexibility, an XLR microphone paired with an audio interface or mixer is the way to go. This setup often gives you better preamps (which boost your mic signal cleanly) and more control over your sound. Don't forget headphones! They're crucial for monitoring your audio quality, ensuring you don't clip (distort) and catching any unwanted background noise while you're recording. Closed-back headphones are best to prevent sound leakage into the mic. Finally, your computer runs the show, handling the recording software (your Digital Audio Workstation or DAW) like the free Audacity or GarageBand, or paid options like Reaper or Adobe Audition.
Here’s your basic shopping list:
- Microphone (USB or XLR)
- Audio Interface/Mixer (if using XLR)
- Headphones (Closed-back recommended)
- Computer/Laptop
- Recording Software (DAW)
Home Podcast Production Essentials
Microphones
USB Microphones (Ideal for Solo Podcasters & Beginners)
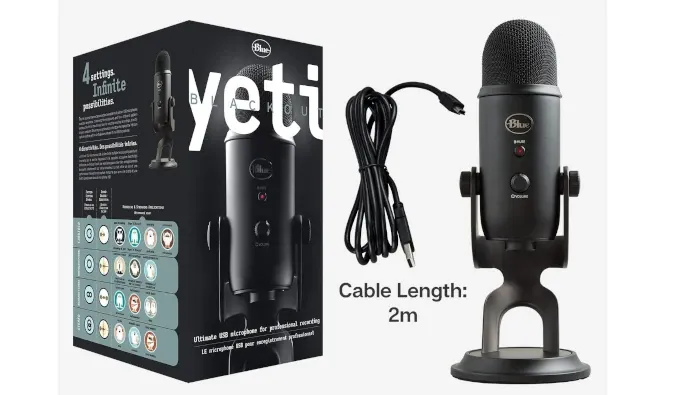
- Blue Yeti USB Microphone
As an Amazon Associate I earn from qualifying purchases.
- Podcast Review: A classic entry point for podcasters. The Blue Yeti's multiple polar patterns (cardioid for solo, omnidirectional for multiple speakers around a table) make it incredibly versatile for various podcasting scenarios. Its plug-and-play USB connection means you can get started quickly with minimal setup. Many podcasters love its warm, clear sound for voice, though it can pick up room ambiance, so a quiet space is key.
- Why it's good for podcasting: Versatile polar patterns, easy USB connectivity, good sound for speech, often comes with a stand.
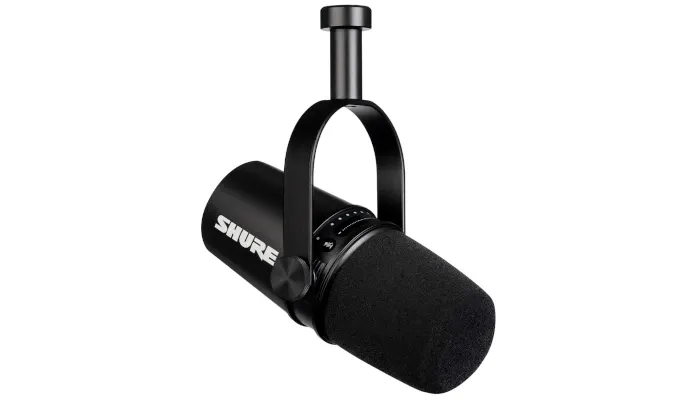
- Shure MV7 USB/XLR Hybrid Podcast Microphone
As an Amazon Associate I earn from qualifying purchases.
- Podcast Review: A highly recommended mic specifically designed with podcasters in mind. It offers both USB and XLR connectivity, providing flexibility as your setup evolves. Its dynamic capsule is excellent at rejecting room noise, making it suitable for less-than-perfect acoustic environments. It also features a useful "Auto Level Mode" which helps maintain consistent audio levels, a huge plus for new podcasters.
- Why it's good for podcasting: Excellent noise rejection, dual USB/XLR connectivity, auto level mode, optimized for speech.
XLR Microphones (For Multi-Person Podcasts & Professional Sound)
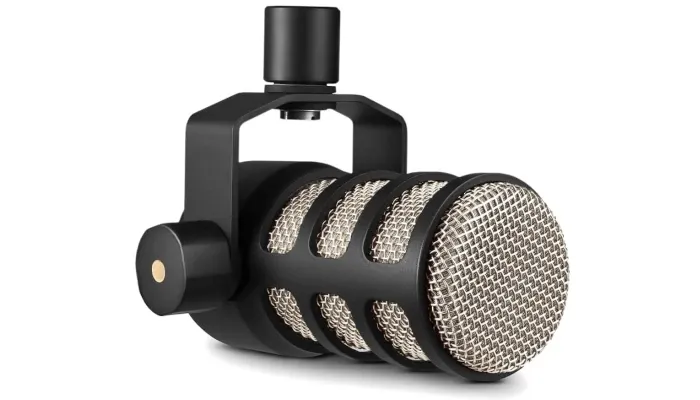
- Rode PodMic Dynamic Broadcast Microphone (XLR)
As an Amazon Associate I earn from qualifying purchases.
- Podcast Review: This mic was literally designed for podcasting! It's a dynamic microphone, meaning it's great at picking up your voice directly in front of it while minimizing background noise – perfect for home studios that aren't perfectly treated. It offers a rich, broadcast-quality sound that many podcasters aspire to, all at an accessible price. Requires an audio interface.
- Why it's good for podcasting: Broadcast-quality sound, excellent off-axis rejection (less room noise), durable build, designed for speech.
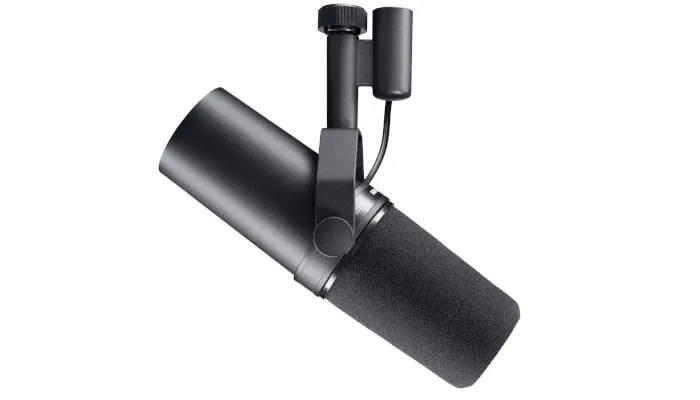
- Shure SM7B Vocal Microphone (XLR)
As an Amazon Associate I earn from qualifying purchases.
- Podcast Review: The "holy grail" of podcasting microphones. You'll hear this mic on countless professional podcasts and radio shows. It's a dynamic mic renowned for its ability to produce a smooth, warm, and rich vocal tone, while effectively isolating your voice from ambient noise. It's an investment, and it requires a strong preamp (often found in higher-end audio interfaces or with an inline pre-amp like a Cloudlifter) but delivers truly professional results.
- Why it's good for podcasting: Iconic broadcast sound, superior noise rejection, incredibly smooth vocal tone, highly durable.
Audio Interface/Mixer (if using XLR microphones)
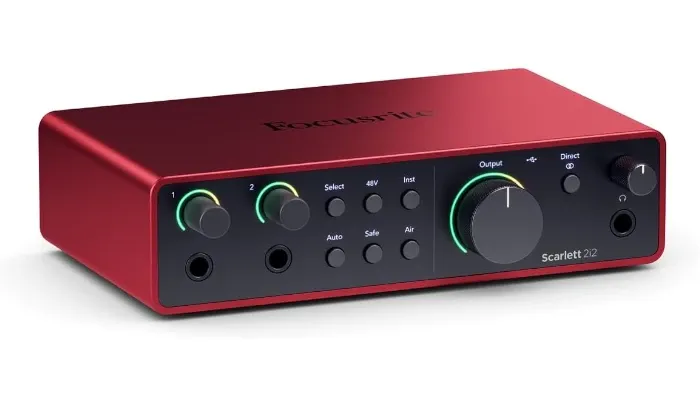
- Focusrite Scarlett 2i2 USB Audio Interface (3rd or 4th Gen)
As an Amazon Associate I earn from qualifying purchases.
- Podcast Review: This is often the go-to recommendation for solo podcasters or duos using XLR mics. It's known for its clean preamps, clear sound, and solid build quality. The "Air" mode can add a nice sparkle to vocal recordings, and direct monitoring eliminates latency while recording. It's a reliable and user-friendly interface.
- Why it's good for podcasting: Two XLR inputs (for host + guest/co-host), clean preamps, low-latency monitoring, easy setup.
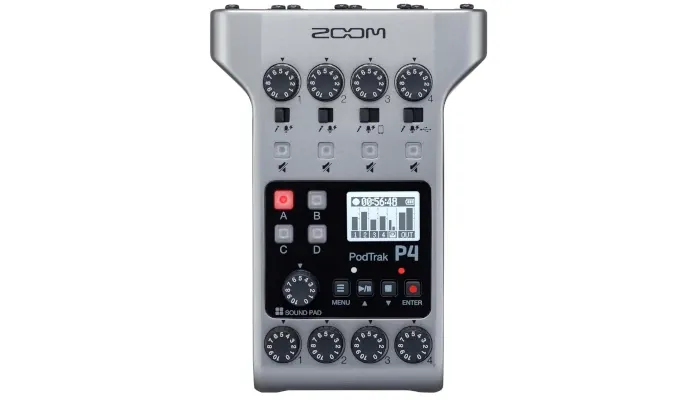
- Zoom PodTrak P4 Portable Multitrack Podcast Recorder
As an Amazon Associate I earn from qualifying purchases.
- Podcast Review: This is a fantastic all-in-one solution for podcasters, especially those who want to record multiple people or take their podcast on the go. It has four XLR inputs, individual headphone outputs with volume control for each person, and built-in sound pads for jingles and sound effects. It can record directly to an SD card, making it incredibly versatile even without a computer.
- Why it's good for podcasting: 4 XLR inputs, individual headphone outs, sound pads, portable, records to SD card, great for interviews.
Headphones (Closed-back recommended for monitoring)
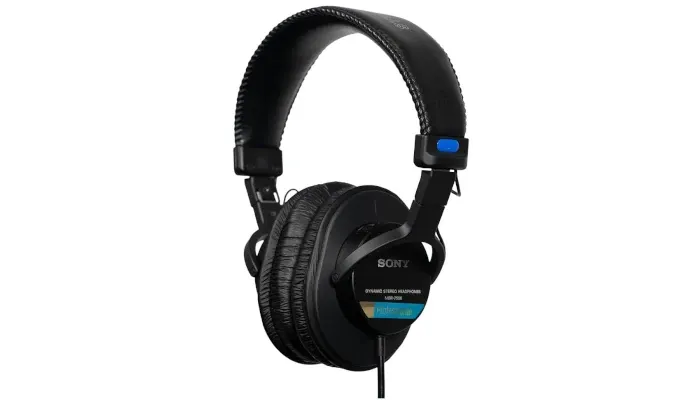
- Sony MDR-7506 Professional Large Diaphragm Headphone
As an Amazon Associate I earn from qualifying purchases.
- Podcast Review: These are industry-standard studio headphones for a reason. They offer a relatively flat and accurate sound, which is crucial for hearing what your podcast actually sounds like without hyped bass or treble. Their closed-back design provides excellent isolation, preventing audio from leaking out and being picked up by your microphone during recording. They are also comfortable for long editing sessions.
- Why it's good for podcasting: Accurate sound for monitoring, excellent sound isolation, comfortable, durable.
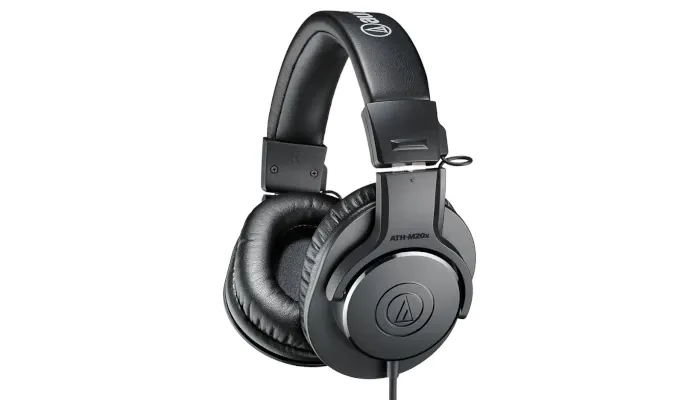
- Audio-Technica ATH-M20x Professional Studio Monitor Headphones
As an Amazon Associate I earn from qualifying purchases.
- Podcast Review: A more budget-friendly closed-back option that still delivers good sound quality and crucial isolation for podcasting. They provide a clear listening experience without excessive coloring of the sound. While perhaps not as premium as the Sony MDR-7506, they are a solid choice for beginners to monitor their audio accurately and prevent mic bleed.
- Why it's good for podcasting: Good sound isolation, affordable, clear sound for monitoring, comfortable.
Computer/Laptop
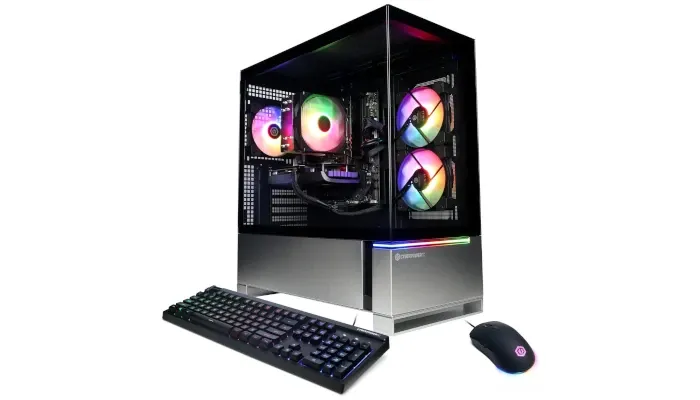
- CyberPowerPC Gamer Master Gaming PC, AMD Ryzen 7 8700F 4.1GHz, GeForce RTX 4060 Ti 8GB, 16GB DDR5, 1TB PCIe Gen4 SSD, WiFi Ready & Windows 11 Home
As an Amazon Associate I earn from qualifying purchases.
As an Amazon Associate I earn from qualifying purchases.
- Podcast Review/Considerations: For home podcast production, you need a computer or laptop that can handle audio recording and editing software smoothly.
- Key Specs:
- Processor: A modern multi-core processor (Intel i5/i7, AMD Ryzen 5/7, or Apple M-series) is highly recommended for efficient rendering and processing of audio.
- RAM: 8GB RAM is a minimum, but 16GB or more will provide a much smoother experience, especially when dealing with multiple audio tracks, effects, and virtual instruments.
- Storage: An SSD (Solid State Drive) for your operating system and audio project files is crucial for fast loading times and smooth recording. A 500GB or 1TB SSD is a good starting point.
- Ports: Enough USB 2.0/3.0/USB-C/Thunderbolt ports to connect your microphone, audio interface, and any other peripherals.
- Why it's good for podcasting: Sufficient processing power and RAM ensure smooth recording and editing without dropouts or crashes. An SSD provides fast access to your audio files.
- Key Specs:
Recording Software (DAW - Digital Audio Workstation)
- Adobe Audition (Subscription-based)
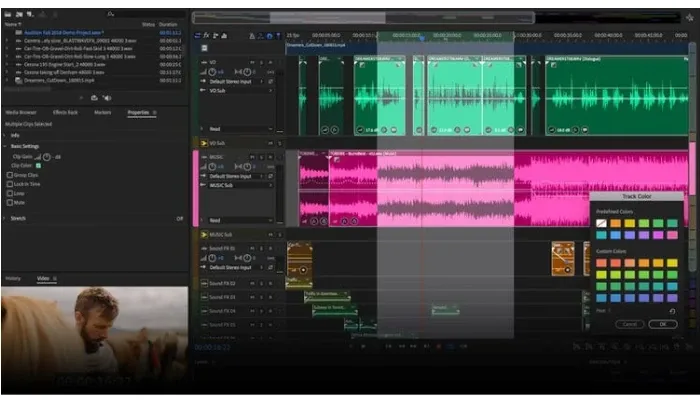
- Podcast Review: A professional-grade DAW specifically designed for audio editing, mixing, and restoration. It's part of the Adobe Creative Cloud suite, making it a popular choice for those already in the Adobe ecosystem. It offers powerful noise reduction tools, multi-track editing, and precise control over your audio, making it excellent for cleaning up and polishing podcast episodes. The learning curve is moderate.
- Why it's good for podcasting: Professional-grade audio editing, powerful noise reduction, multi-track capabilities, excellent for post-production.
- Reaper (Affordable, one-time purchase)
- Podcast Review: A highly customizable and powerful DAW that's incredibly affordable. While its interface might seem less intuitive at first glance, it's a favorite among experienced audio professionals due to its flexibility and efficient workflow. It's lean on system resources and can handle complex multi-track podcast projects with ease. It requires a bit of learning but offers immense value.
- Why it's good for podcasting: Highly customizable, affordable, resource-efficient, professional features, great for advanced editing and mixing.
- Audacity (Free)
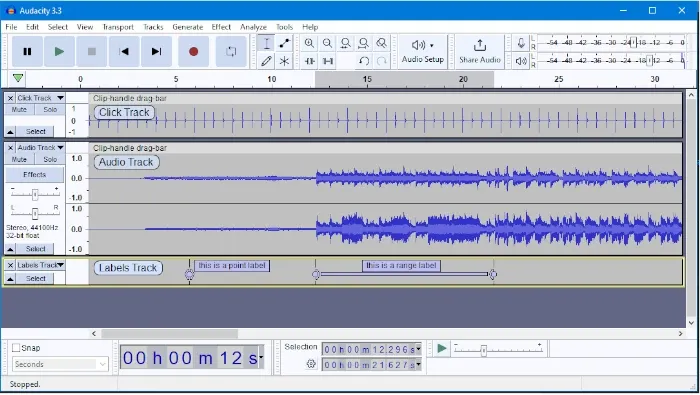
- Podcast Review: The go-to free option for beginners. Audacity is surprisingly capable for basic recording, editing (cutting, trimming, fading), and simple effects. It's excellent for recording a solo podcast or for doing quick edits. It's not a full-fledged DAW for complex music production, but for getting your podcast off the ground without spending money on software, it's an invaluable tool.
- Why it's good for podcasting: Free, easy to learn, good for basic recording and editing, cross-platform.
- GarageBand (Free for Mac/iOS users)
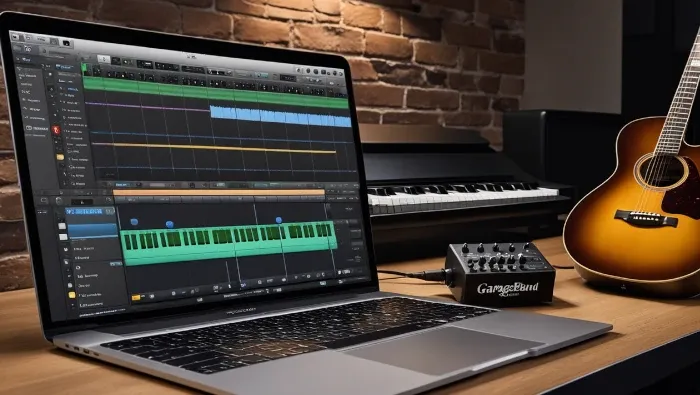
- Podcast Review: If you're an Apple user, GarageBand is an excellent free starting point. It's incredibly intuitive, making it easy to record, edit, and add music or sound effects to your podcast. While it has limitations compared to professional DAWs, it's more than sufficient for many beginners and offers a smooth transition to Logic Pro if you decide to upgrade later.
- Why it's good for podcasting: Free for Apple users, extremely user-friendly, good for basic to intermediate podcast production, seamlessly integrates with macOS/iOS.
Remember to check Amazon.com US for the latest prices, bundles, and user reviews before making your final decision!
Example: Meet Sarah. She wanted to share her passion for baking via podcast. She didn't have a huge budget, so she grabbed a decent USB mic, used her existing laptop, downloaded Audacity, and plugged in her old gaming headphones. She set up in her quietest room, put the mic on a small desk stand, and recorded her first episode talking through a recipe. It wasn't a million-dollar studio sound, but it was clear, listenable, and she successfully started her podcast right from her kitchen table.
Practical Tip: Don't feel pressured to buy the most expensive gear immediately. Start with reliable entry-level equipment (like a good USB mic and free software) to get comfortable with the process. You can always upgrade later as your podcast grows and you learn more about what you need to record podcast from home effectively.
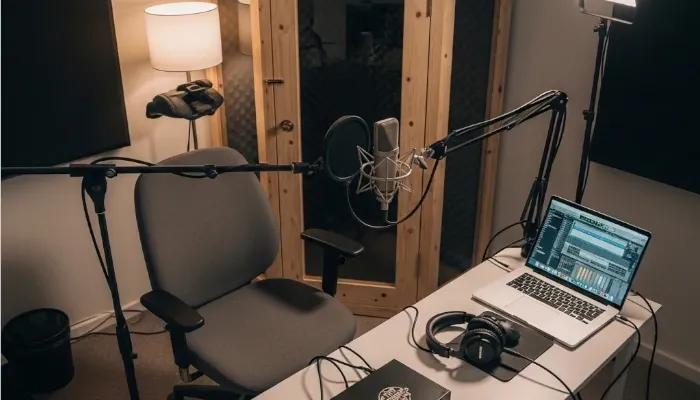
Setting Up Your Home Recording Studio
Alright, you've got your gear, now where do you put it? Setting up your home recording studio , even just for podcasting, is key to getting clean audio when you 'record podcast from home'. You don't need a fancy soundproof booth! The goal is to minimize unwanted noise and echoes in your recording space. Find the quietest spot in your house. This might be a bedroom away from street noise, a basement, or even a large closet (seriously, they work!). Avoid rooms with lots of hard, reflective surfaces like bare walls, tile floors, or large windows – these cause echo and reverb that make your audio sound distant and unprofessional.
Once you've picked your spot, think about acoustics. Soft surfaces absorb sound, reducing echoes. Use what you have! Blankets, pillows, duvets, thick curtains, or even putting a couch in the room helps a ton. Place your microphone strategically – often pointing away from the loudest source of noise (like a window) and towards softer surfaces. Get your computer set up so its fan noise isn't picked up by the mic. A desk or table is fine, but make sure it's stable so you don't bump it during recording.
Here's a quick setup checklist:
- Choose the quietest room available.
- Add soft materials (blankets, pillows, curtains) to reduce echo.
- Position mic away from noise sources and towards soft surfaces.
- Set up computer/desk in a stable spot.
- Test your setup before recording!
Example: Let's say Mark wants to record his gaming podcast. His living room is too echoey. He tries his small spare bedroom. He hangs some thick blankets on the walls behind where he'll sit and places a few pillows on the floor. He sets up his mic facing a wall covered by a curtain. He records a test, and bam! The echo is way less noticeable than in the living room, making his voice sound much clearer for his listeners.
Practical Tip: Before spending money on acoustic panels, try using household items first. Hang blankets, put pillows in corners, and close curtains. Record a test snippet and listen back with headphones. You'll be surprised how much difference simple soft furnishings make when you're trying to record podcast from home effectively.
Recording and Editing Your Podcast Episodes
Okay, you've got your gear and a decent space to 'record podcast from home'. Now for the fun part: capturing your brilliance and polishing it up! Before you hit that big red record button, do a quick soundcheck. Record about 30 seconds of yourself talking naturally, then listen back with your headphones. Does it sound clear? Is your voice loud enough but not distorting (clipping)? Is there background noise you need to fix? Adjust your mic position or input levels until it sounds right. During recording, try to speak clearly and consistently into the mic. Don't worry about mistakes – that's what editing is for! It can help to pause briefly after a flub, making it easier to cut out later.
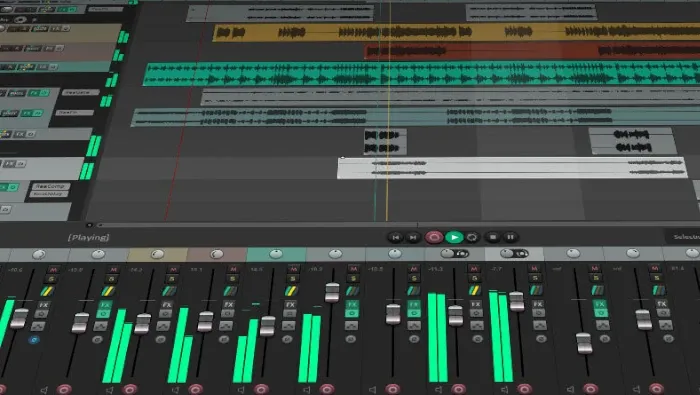
Editing is where your raw audio transforms into a polished episode. Your recording software (Audacity, GarageBand, etc.) lets you see your audio as waveforms. The basic tasks involve cutting out dead air, "ums," stutters, and mistakes. You'll also want to level the volume so your voice is consistent throughout and potentially remove distracting background noise. Finally, you'll add your intro music, outro music, and any sound effects or ads. Don't feel like you need to become an audio engineer overnight; focus on making the content flow smoothly and sound listenable.
Key steps:
- Perform a soundcheck before recording.
- Record your episode, speaking clearly.
- Import audio into your DAW.
- Cut out mistakes and dead air.
- Adjust volume levels.
- Add intro/outro music.
Example: Sarah, with her baking podcast, recorded an episode where she accidentally knocked over a measuring cup midway through. Instead of stopping, she just paused, cleaned it up, and continued. In Audacity, she easily found the spike in the waveform where the cup dropped, cut that section out, and spliced the two good pieces together. She also removed a few "uhs" and boosted her volume slightly, making the final episode sound seamless and professional despite the small mishap.
Practical Tip: Spend a few minutes before recording to ensure your levels are good and your space is quiet. The better your original recording, the less time you'll spend fixing things in editing, making the whole process of how to record podcast from home much smoother.
Publishing and Promoting Your Podcast
Alright, you've mastered how to 'record podcast from home', got your episodes edited and sounding great. Now what? Time to get your voice out there! First, you need a podcast hosting platform. Think of this as the place where your audio files live online. Services like Anchor (free), Buzzsprout, Libsyn, or Podbean store your episodes and generate the magic link called an RSS feed. This RSS feed is what podcast directories like Apple Podcasts, Spotify, Google Podcasts, and Stitcher use to find and display your show.
Once your podcast is hosted, you submit your RSS feed to these major directories. This is usually a one-time process for each platform. After approval (which can take a few hours to a few days), new episodes you upload to your host will automatically appear on these apps! But just being listed isn't enough; you need to promote! Share your episodes on social media, tell your friends and family, consider starting an email list, or even appearing as a guest on other podcasts in your niche. Good titles, descriptions, and show notes using relevant keywords help people find you when searching. Boost your podcast reach with these top strategies.
Here are the key steps:
- Choose a podcast hosting platform.
- Upload your finished episode audio.
- Submit your RSS feed to major podcast directories.
- Share new episodes on social media and other channels.
- Use good titles and descriptions.
Example: Remember Sarah and her baking podcast? After uploading her first episode to Anchor, she took the RSS feed and submitted it to Apple Podcasts and Spotify. Once listed, she created short video clips of her recording process (showing her simple home setup, proving you can record podcast from home!) to share on Instagram and Facebook, driving traffic to her show's links. She also asked friends to share, getting those initial listens.
Practical Tip: Don't just post a generic link. When promoting on social media, share a specific takeaway or funny moment from the episode to entice people to listen. Make it easy for your audience to find and click!
Your Podcasting Journey Starts Now
From selecting essential equipment like microphones and headphones to setting up a home recording space with blankets and pillows, you've learned how to 'record podcast from home' without breaking the bank. Mastering recording and editing software, publishing your episodes on hosting platforms, and promoting your content on social media are all crucial steps to getting your voice heard. It's time to embrace the journey, experiment with your style, and share your unique perspective with the world.
Ready to start creating? Grab your gear, find your quiet space, and record your first episode today!
Rodrigo Marques
Rodrigo Marques, founder of Home Studio Start, is a music production veteran with over 25 years of experience. Since 1997, he has mastered tools like Sound Forge, Samplitude Pro, and VST plugins, producing albums for emerging artists globally. Creator of the innovative Formula HSS for mixing and mastering, Rodrigo has empowered thousands through online courses and his ebook, Home Studio Start. Dedicated to democratizing music production, he equips aspiring artists with skills for professional-grade music and sustainable careers.
About the author