Tired of your home studio sounding like a tin can? You don't always need expensive acoustic treatment to make a real difference. This article explores how strategically using curtains and rugs can significantly improve your sound. We'll start with the science of sound absorption, explaining how these everyday items trap sound waves and reduce unwanted reflections. Next, we'll dive into choosing the right curtains, focusing on fabrics, thickness, and linings that maximize sound dampening. Then, we'll move onto selecting rugs for acoustic control, discussing the importance of material, pile height, and strategic placement. Finally, we'll go beyond the basics, showing you how to optimize the placement of your curtains and rugs for maximum sound absorption and a more professional-sounding space.
The Science of Sound Absorption: How Curtains and Rugs Work
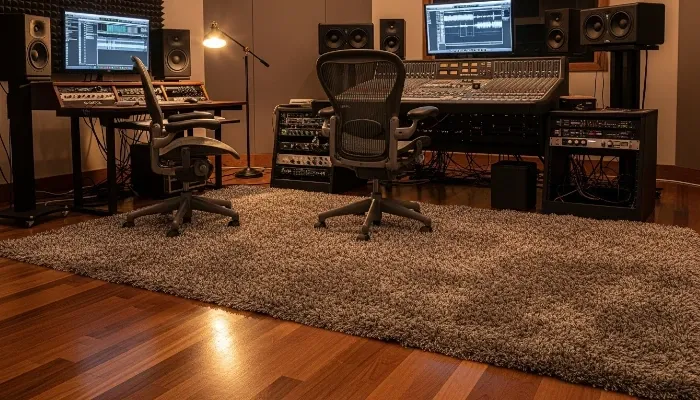
Alright, let's talk about taming those wild sound waves bouncing around your home studio . You don't need fancy acoustic panels everywhere to start making a difference. Simple stuff like curtains and rugs work because of a basic principle: absorption. When sound waves hit a hard, flat surface (like a bare wall or floor), they reflect right back, causing echoes and making your room sound messy. Soft, porous materials like fabric in curtains and rugs, however, absorb some of that energy. The sound waves get trapped in the fibers, vibrating them and converting that acoustic energy into a tiny amount of heat. This reduces reflections and makes your room sound tighter.
Now, these household items aren't miracle workers for all frequencies. They are most effective at absorbing mid to high frequencies. Those booming low-end frequencies? They'll pretty much pass right through. But tackling the mids and highs is crucial for reducing annoying flutter echo (that rapid slapback sound between parallel surfaces) and making your room sound less "live" and more controlled, which is exactly what you want when you're recording or mixing. For more on achieving a balanced sound, explore master audio mixing balance .

Example: Think about Sarah. She set up her first vocal booth in a small room with hardwood floors and a bare wall. Every time she sang, the sound bounced like crazy, making her recordings sound distant and echoey. We grabbed a thick, shaggy rug for the floor and hung some heavy velour curtains on the bare wall. Suddenly, the room felt much drier, and her vocals sounded clearer and more direct in her mic. It wasn't perfect acoustic treatment, but it was a massive improvement using everyday items. If you're looking to build a vocal booth, check out this guide to building a pro vocal booth at home .
Practical Tip: When Using Curtains and Rugs for Sound Control, go for density and thickness. Thin, sheer curtains won't do much. Look for heavy drapes, blackout curtains, or even moving blankets. For rugs, the thicker and plusher, the better. Place them strategically: a thick rug on a hard floor is essential, and heavy curtains over windows or large, reflective wall spaces can make a huge difference.
Choosing the Right Curtains for Sound Dampening: Fabrics, Thickness, and Linings
Picking the right curtains isn't just about blocking light; it's a key move for better sound control in your recording space. When Using Curtains and Rugs for Sound Control, the curtains you choose play a big role in taming reflections. The main thing is getting material that's dense and porous enough to absorb sound energy rather than just letting it bounce off. Think heavy fabrics like velvet, velour, or thick microfibre. These materials have a thicker weave and more texture, which helps trap sound waves in their fibers. Lighter fabrics like thin cotton or sheer polyester? They'll look pretty, but acoustically, they're almost useless. For more tips, check out how to improve your home studio acoustics .

As an Amazon Associate I earn from qualifying purchases.
Thickness is your friend here. A single layer of thin fabric won't do much. Look for curtains with multiple layers or, even better, a built-in lining. Linings, especially dense thermal or blackout linings, add significant mass and surface area. This extra bulk makes the curtain a much more effective sound absorber, particularly for mid to high frequencies. More material equals more absorption – simple as that. Hanging them with pleats or folds also increases the effective surface area, helping to scatter and absorb sound more effectively than just a flat panel. If you're setting up your studio, don't forget essential furniture for an efficient recording studio setup .
Example: Mark had a live room with a huge window causing major slapback echo. He tried some cheap, thin curtains first, and honestly, they did almost nothing. We swapped them out for heavy, triple-layer blackout curtains that covered the entire window frame and beyond. The difference was night and day! The room instantly sounded less ringy and much more controlled for tracking acoustic guitar.
Practical Tip: When shopping for curtains for sound dampening:
- Choose heavy, dense fabrics (velvet, velour, thick microfibre).
- Look for multiple layers or a thick, integrated lining (blackout or thermal linings are great).
- Ensure they are wide enough to cover your window or wall section completely, with some overlap.
- Hang them floor-to-ceiling if possible for maximum effect.
Selecting Rugs for Acoustic Control: Material, Pile Height, and Placement
Okay, let's slide over to the floor situation. Hard floors like wood, tile, or laminate are sound reflection machines. They bounce sound waves straight back up, creating flutter echo and generally making your room sound live and uncontrolled. This is where a good rug comes in handy when Using Curtains and Rugs for Sound Control. Just like curtains absorb sound on walls, rugs absorb it on the floor. They break up those flat, reflective surfaces and trap sound energy in their fibers, helping to tame reflections and make your space sound much more balanced. For more on noise reduction, see mastering noise control .
When picking a rug for acoustic control, the key is thickness and density. Thin, flat-weave rugs or those cheap office chair mats won't do much. You want something with a substantial pile height – think shag rugs, thick wool rugs, or even heavy Berber styles. The longer and denser the fibers, the more surface area there is to interact with and absorb sound waves, especially in the mid to high-frequency range. Material matters too; natural fibers like wool tend to be good absorbers, but thick synthetic rugs work well too.
Placement is just as important as the rug itself. The most crucial spot is usually the area directly in front of your monitoring position or where sound is bouncing most between your speakers and your listening spot. Covering a significant portion of the floor in your recording area (vocal booth, drum area, etc.) will make a noticeable difference. Don't just put a tiny doormat down; aim for a rug large enough to cover the main reflection points. When setting up your monitors, consider nearfield vs farfield monitors .
Example: Leo had a mixing room with a beautiful hardwood floor, but his mixes sounded harsh because of the floor reflections hitting his ears. He added a large, thick shag rug that covered the area between his speakers and his listening chair, plus a bit more. Suddenly, the high-end harshness smoothed out, and he could hear details in his mixes much more clearly.
Practical Tip: When choosing a rug for acoustic control:
- Prioritize thick, high-pile rugs (shag, thick wool, dense synthetic).
- Ensure it's large enough to cover the primary reflection zone on your floor.
- Place it strategically between your sound source (speakers, instrument) and your listening/recording position.
Beyond the Basics: Optimizing Curtain and Rug Placement for Maximum Sound Absorption
So, you've got your thick curtains and plush rugs – awesome! But just throwing them anywhere won't give you the best results.
Using Curtains and Rugs for Sound Control is most effective when you think strategically about where sound is hitting and bouncing. The goal isn't just to make the room look cozy; it's to break up the direct paths of sound waves reflecting off hard surfaces before they get back to your microphone or your ears. This means targeting the primary reflection points. For more on microphones, see why are some microphones so fuzzy .
For curtains, the most obvious place is over windows, as glass is highly reflective. But also consider bare walls, especially large ones parallel to each other. Hanging heavy curtains on one or both of these walls can significantly reduce flutter echo. For rugs, the absolute must-have spot is on the floor between your studio monitors (or instrument) and your listening or recording position. This area is where the most critical floor reflections happen. Think of it like shining a laser beam from your speaker to your ear – where that beam hits the floor is a primary reflection point you want to cover. Also, don't forget to check out top studio monitors for small spaces .
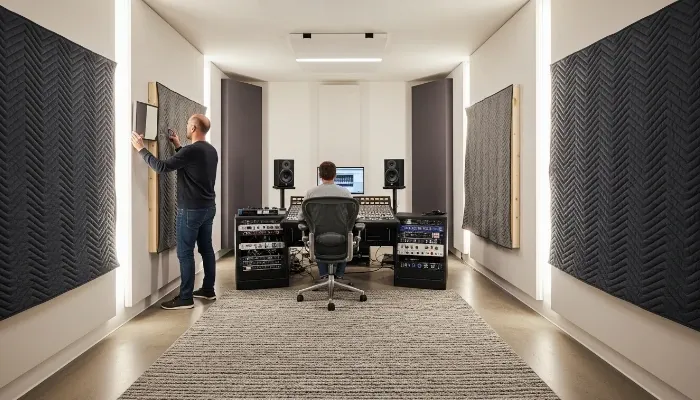
Example: Dave, had a small mixing room with parallel walls and a concrete floor. He put a nice rug in the middle but still had weird echoes. We identified the first reflection points on the side walls (using the mirror trick – sit in your listening spot, have someone move a mirror along the wall, and where you see the speaker is a reflection point) and hung heavy moving blankets (acting like thick curtains) on those spots. Combined with the rug, the room tightened up dramatically, and his mixes instantly sounded more accurate.
Practical Tip: To optimize placement when Using Curtains and Rugs for Sound Control:
- Use the mirror trick to find the first reflection points on your side walls and ceiling (though rugs/curtains are less effective on ceilings).
- Place your thickest rug on the floor directly between your speakers/sound source and your listening/recording position, covering the first reflection area.
- Hang heavy curtains on windows and consider bare parallel walls to reduce flutter echo. The more coverage on large, flat surfaces, the better.
Sound Absorption Success: Curtains and Rugs to the Rescue
We've explored how strategically using curtains and rugs can significantly improve your room's acoustics. Remember, the key is leveraging dense, thick materials to absorb sound waves, targeting those first reflection points on walls and floors. From choosing the right fabrics and pile heights to optimizing placement for maximum coverage, you now have the knowledge to transform your space into a more controlled and pleasant listening environment. So, ditch the echo and embrace clarity – start experimenting with curtains and rugs today and unlock your room's sonic potential!
Rodrigo Marques
Rodrigo Marques, founder of Home Studio Start, is a music production veteran with over 25 years of experience. Since 1997, he has mastered tools like Sound Forge, Samplitude Pro, and VST plugins, producing albums for emerging artists globally. Creator of the innovative Formula HSS for mixing and mastering, Rodrigo has empowered thousands through online courses and his ebook, Home Studio Start. Dedicated to democratizing music production, he equips aspiring artists with skills for professional-grade music and sustainable careers.
About the author